Setup universal links in Xamarin iOS

I had to implement universal links functionality in Xamarin iOS this week and boy… that didn’t go well for what was a simple issue in retrospect.
This blog post will describe the integration in quick summary as there’s enough documentation to find on the web and it will also describe the problem I had.

How to add universal links to your Xamarin.iOS app?

  1. Upload the apple-app-site-association file to the root of your website or in the .well-known subdirectory and make sure it’s served via HTTPS
    1. If it’s served via HTTPS and you don’t need to target iOS8, don’t bother trying to sign the JSON file. A plain simple JSON file will do.
  2. Enable the “Associated Domains” functionality in the Apple Developer Center for your app and regenerate the provisioning profile
  3. Add the domain(s) you want to add universal linking for to your iOS Entitlements file in the section “Associated Domains”
    1. Make sure to add the applinks: prefix (ex. applinks:ctcode.wordpress.com)
  4. Implement the logic in the AppDelegate class

This is not very difficult, but if it doesn’t work right away, it’s somewhat difficult to debug.
The first thing I did was adding a link of the website I wanted to support in the Notes app on my iPhone so I could test the integration.
I then did a long push on the link until a little menu popped up with options and verified if there was an item available with “Open with [my-awesome-app]”.

But unfortunately, no success.
As described in this Medium blog post, you can verify if the correct calls are done on app install (or update) by looking at the logs of the device in Xcode.

But since iOS10, searching these logs is quite cumbersome as there’s a lot (I mean really a lot) of logs in Xcode.
A good tool to use instead is iOS Console.

Uninstall the app, fire up iOS Console, filter the list on association and install the app again.
When the app is installed, you should see that the app is requesting the apple-app-site-association file for the domains you configured in the Entitlements file (first in the .well-known directory and then in the root of the site).

A working example
A working example

But alas, this wasn’t the case in this app.
Because I rechecked everything and was quite certain everything was setup correctly, I created a new empty Xamarin.iOS project.

I configured everything as described above and… the requests to the site popped up in the logs!

OK, I was convinced now that I did everything by the book. But why wasn’t this working in the other project?
I tried removing some SDK’s because maybe there was an SDK interfering with it, but quickly found out this wasn’t the case.

Next step was to compare the configuration of the iOS project – which was causing me headaches – and the empty Xamarin.iOS project.
And I quickly noticed that there was a setting missing in the non-working project in the tab “iOS Bundle Signing”.

project_options_ios

The location of the Entitlements file was not filled in.
I don’t know if previous versions of Xamarin Studio did not fill this in automagically or if someone removed it, but when selecting the file in the project, everything worked as expected.

One of those days I guess…

How to manage your iOS provisioning profiles without Xcode?

Most people use Xcode to manage their provisioning profiles.
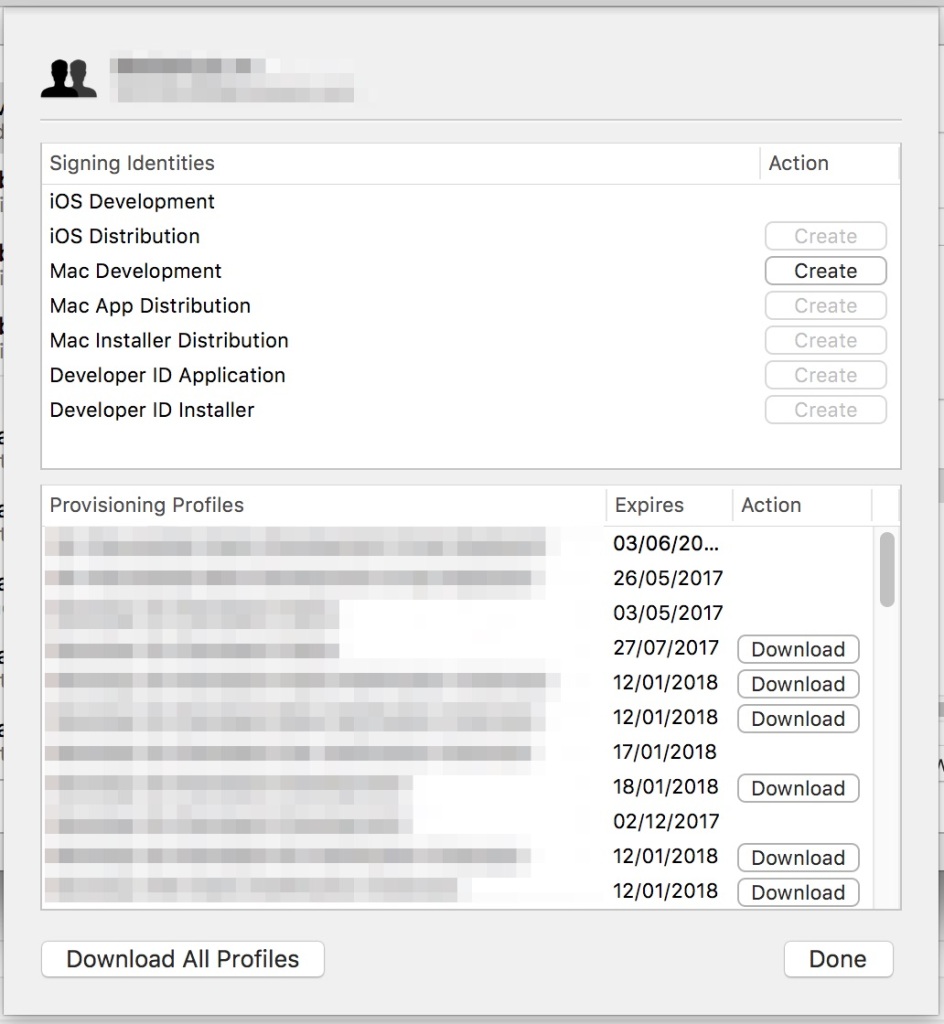
You log in with your Apple account and download the required provisioning profiles. This actually works pretty well as it gives you a good overview of all the downloaded provisioning profiles.

Xcode management for provisioning profiles

By right-clicking on the provisioning profile, you can navigate to the correct file in Finder.

Xcode Show in Finder

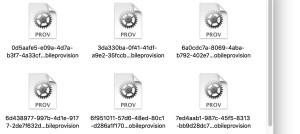
And now you notice that every provisioning profile is not named like you have named it on the Apple Developer Center.

iOS provisioning profiles in Finder

It’s not problematic as you can jump to the correct provisioning profile from Xcode, but I prefer them being named like I named them on the Apple Developer Center.
A tip I found in this video is adding the folder with the provisioning profiles (can be found in /Users/[your-username]/Library/MobileDevice/Provisioning Profiles/) to the sidebar in Finder.

Finder sidebar
Finder sidebar

Now you can download the provisioning profile from the Apple Developer Center itself.
Don’t double-click on it (because the name is also scrambled when you do this) but drag it in this folder.
Now you can manage your provisioning profiles as organized as on the Apple Developer center!

Difference between Points and Pixels

Understanding pixel density in digital screens is essential for any screen-based designer.
What do terms like “1x” and “2x” really mean, and why do they matter? And, most importantly, how can you manage the increasing complexity of designing for devices with a wide range of pixel densities?

Medium Article: medium.com/@pnowelldesign/pixel-density-demystified-a4db63ba2922
Helpful Resources: sketchmaster.com/pixel-density/?sm_s=vmdsc
Source: http://ivomynttinen.com/blog/ios-design-guidelines

Learning Git

This is going to be a very short blogpost, but I just wanted to share some information about learning Git.
When I started doing mobile app development with Xamarin about a year ago, I also needed to make the switch from TFS to Git.

I never did a very large project with Git so the knowledge I had at that point was from reading some blog posts and tutorials and trying some samples.
So when I had to opportunity to finally use it on a bigger project I really wanted to learn the more “advanced” stuff.

At the beginning I learned the basic Git commands to really get familiar with it and tried to learn some new commands along the way.
There were also some technical sessions (thank you @wardpeet!) at my current customer which introduced me to some new concepts and viewing the following Pluralsight courses were a big help as well!

  • How Git works
    This course is for developers and system administrators who want to really understand Git. Whether you just started using Git, or you’ve been using it every day for months – this course will give you the knowledge you need to become a Git master.
  • Git Advanced tips and tricks
    Get the most out of Git by exploring its lesser-known features to take your daily workflow to the next level. This course teaches you how to find a good workflow, track commits, and even debug.

Xamarin Studio: Navigating back and forward in the editor

One feature I use a lot (and you start noticing this when you don’t have it anymore) is the key combination CTRL and -.

In Visual Studio this navigates back to the previous point in code. So when navigating all around the code with CTRL and a mouse click (thank you ReSharper!), it’s a very useful shortcut to navigate back.

Because I am developing on a Mac in Xamarin Studio for the current project, I missed this feature immediately.
I tried searching for it, but couldn’t find the correct shortcut.

Until now!
I don’t know if it has always been available, but if you press CTRL, CMD and the arrow key left or right, you can easily navigate through the code. Hurray!

You also find this under “Search” >> “Navigate back” (or “Navigate forward”).

Continous integration with Xamarin, TeamCity and FAKE – Part 2

In the previous post I talked about setting up your environment with different build configurations so you can easily switch between an alpha, beta or production iOS/Android build.

This time I’ll talk about creating a build script which you can use with your CI implementation.

Our weapon of choice? FAKE.

“FAKE – F# Make” is a build automation system with capabilities which are similar to make and rake. It is using an easy domain-specific language (DSL) so that you can start using it without learning F#. If you need more than the default functionality you can either write F# or simply reference .NET assemblies.

Little note: there’s actually a similar project in C# called CAKE but it hasn’t the complete functionality we need at the moment (HockeyApp integration is one of the missing parts).

Our build script will have several targets.

Targets are the main unit of work in a “FAKE – F# Make” script. Targets have a name and an action (given as a code block).

We’ll cover the Android setup here, but you should be able to easily set this up for iOS yourself.
The targets of the Android project are:

  • “restore-packages-project”
  • “restore-xamarin-components-android”
  • “android-build”
  • “android-package”
  • “android-hockeyapp” (will be discussed in a future post)

Each target in the list has a dependency on the target above it.
If you execute the android-build target, it will automagically run restore-xamarin-components-android and restore-packages-project.

How do we define this dependency in FAKE?

“restore-packages-project”
==> “restore-xamarin-components-android”
==> “android-build”
==> “android-package”

Place this at the bottom of your script.
Now let’s create each target.

Target "restore-packages-project" (fun _ ->
     String.Format("../solutions/{0}.sln", projectName)
     |> RestoreMSSolutionPackages (fun p ->
         { p with
             OutputPath = "../solutions/packages"
             Retries = 4 })
)

This target will restore all NuGet packages in the given solution.
As you can see the project name is defined in a variable which allows for reuse on different projects.

Target "restore-xamarin-components-android" (fun _ ->
    Shell.Exec "mono" ("tools/xamarin-component.exe restore" + android_solution)
)

If you don’t use Xamarin Components, you can delete this step.
If you do need this, you will first need to download the xamarin-component.exe. The link provided will download a XPKG file. Change the extension to a ZIP-file and extract the contents.

Place this file somewhere where your script can access it and provide the correct path to it in the script.

Remark: You will need to run the .exe one time manually on the build server because it will ask for your Xamarin credentials. You only need to do this once.

Target "android-build" (fun () ->
    CleanDirs [buildFolder + "/android/"]

    let buildProperties = 
            [("Configuration", buildConf); ("Platform", "Any CPU"); ("VersionCode", buildcounter); ("VersionName", releaseversion)]

    MSBuild (android_buildFolder) "Rebuild" buildProperties [android_solution] |> ignore
)

This target will do the actual compiling of the project.
It first cleans the directories and then starts the compiling with the correct parameters.

The projectBuildConfiguration variable will contain our alpha, beta or production build configuration from the previous post.
The buildcounter variable is the incrementing value used when new versions are released and the releaseVersion variable is the semantic version number.

That’s it. How do we trigger this FAKE script?
We’ve used a Bash script:

#!/bin/bash

while getopts :t:p:r:c:b:n: FLAG; do
  case $FLAG in
    t)
      TARGET=$OPTARG
      ;;
    r)
      # SEMVER
      RELEASE=$OPTARG
      ;;
    c)
      # INCREMENTING BUILD COUNTER
      COUNTER=$OPTARG
      ;;
    b)
      BUILDCONF=$OPTARG
      ;;
    n)
      PROJECTNAME=$OPTARG
  esac
done

nuget install FAKE -Version 4.6.2 -OutputDirectory packages -ExcludeVersion
mono packages/FAKE/tools/Fake.exe build.fsx $TARGET release=$RELEASE counter=$COUNTER buildconf=$BUILDCONF projectName=$PROJECTNAME

This Bash script will download the F# FAKE Nuget Package and call our script with the correct parameters.
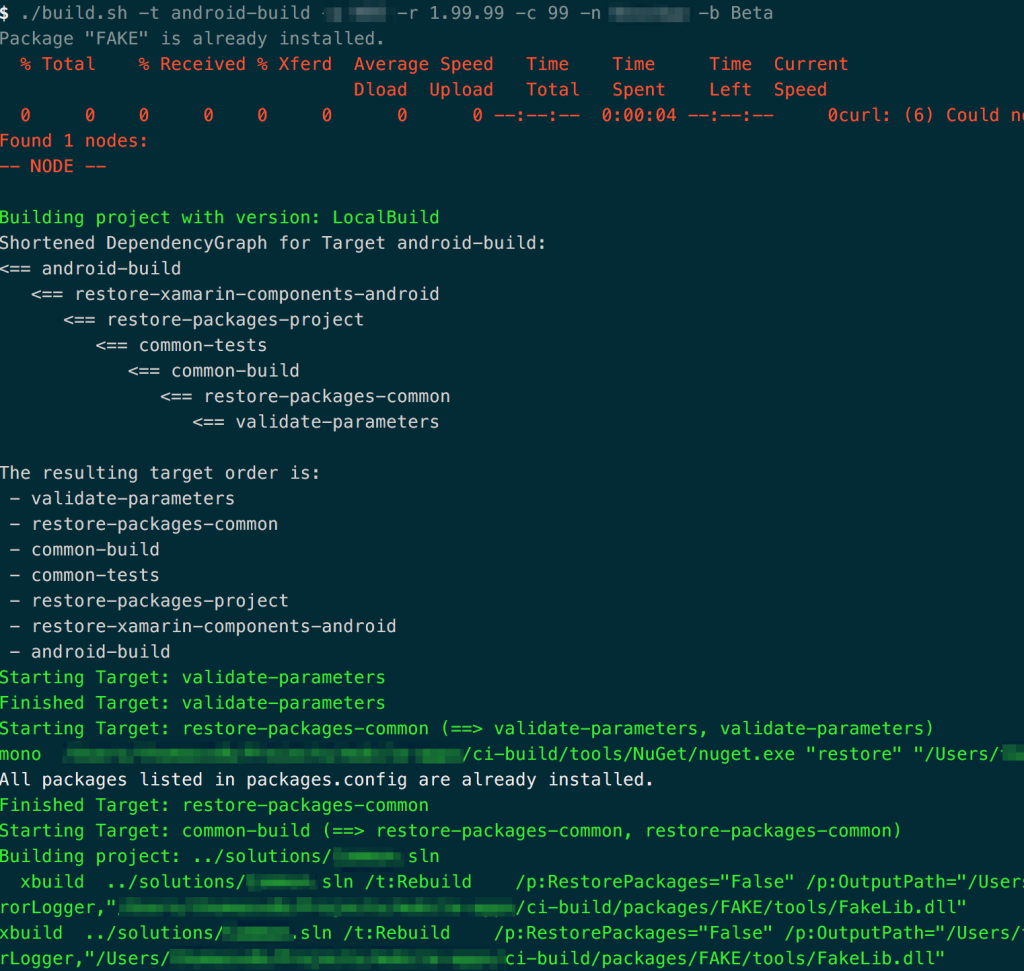
You can completely test this script on your local machine before integrating it into your CI process.

ci-build__fake__blog

As you can see in the screenshot above, there are some extra steps of compiling a common solution (which contains PCL libraries to share between Android and iOS) and some unit tests steps which were out of the scope of this blog post.

Happy integrating!

Continous integration with Xamarin, TeamCity and FAKE – Part 1

A couple of months ago I had the opportunity to join a new mobile app development team.

It has been really fun and interesting, but coming from a web development area, it has been quite challenging as well.
One of the first things we focused on was setting up a CI build. We wanted to create a new version at every check-in which could easily be distributed.

Thus, the overall focus of this series of posts will be setting up a CI build for Android and iOS Xamarin projects with TeamCity and FAKE.

I’ll split up the complete explanation into several blog posts.

Remark: The solution I will describe here is not something I invented myself. This has been a team effort so credits to all the colleagues on the team.

Creating an alpha, beta and store version of your Android and iOS Xamarin project

What do we want to achieve?
During development every check-in in source control should create a new package (an IPA or APK file) which users can then install. This will be the alpha version.

When the sprint is finished, we create a new branch in our source control system which will be our beta version from now on.
However, the test users should also be able to test the beta version without losing the alpha version on their phone. This means that the beta version should not overwrite the alpha version.

How can we achieve this?
We need to focus on the bundle ID. Both on Android and iOS the bundle ID mostly contains your company name and project ID.

Example:

com.ctcode.wordpress.continuousintegration

This will be the ID for our production version but we need to create two other bundle IDs for our alpha and beta version.

com.ctcode.wordpress.continuousintegration.alpha
com.ctcode.wordpress.continuousintegration.beta

This will allow side-by-side installation of the different build versions because the OS actually identifies this as three different apps.
The only downside of this approach is that you will have three apps with the exact same name and icon. This makes it very hard to identify which is the alpha, beta or production version.

One solution is to create a seperate icon for each version. We’ll get back to that later on.

What is the easiest way to quickly switch between these different versions?
The solution we’ve choosen is a combination of different build configurations and MSBuild tasks.

You need to create a build configuration for the alpha version, one for the beta version and one for the store.
The naming of your build configurations is important as you will see later on.

Name your build configuration as follow and create one for AnyCPU, iPhone and iPhoneSimulator.

  • Alpha
  • Beta
  • AppStore

Make sure to configure each build configuration correctly. You don’t want to enable DEBUG symbols for your AppStore build configuration.

Determine the app ID with an MSBuild task

The next step is to determine the bundle ID based on the choosen build configuration.
This can be accomplished with custom MSBuild tasks.

I can’t show you any code but the idea is to create two MSBuild tasks.
One task is responsibly for determing the current build configuration and outputting the correct bundle ID.

The output of this MSBuild task is then used in the second MSBuild tasks which writes the bundle ID to the Info.plist file and/or Android manifest file.

At every compile the MSBuild tasks will now write the correct bundle ID.
In a next post we will use these build configurations in an build script with FAKE so we can setup a TeamCity alpha and beta configuration.

But what about a different icon for each release version?
You can use the same approach by creating an MSBuild task which copies the correct icon from a folder based on the choosen build configuration.

Next upcoming post: Creating a build script with FAKE


Customizing the Windows Phone 8 WebView

I’m currently trying to make my first Windows Phone app (a bit late to the party I know).
One of the requirements I have is showing HTML, which I fetch from a REST service, in the app.

But this was more challenging than expected.

To show HTML I need to use a WebView.
But there is no databinding support for HTML strings (as far as I know?), the WebView should scale with the content inside it and I should be able to scroll inside my app view (not inside my WebView) so I need a way to disable the scrolling ability in the WebView.

It’s possible that the content of my WebView is larger than the available screen estate but that’s not a problem because I can add a ScrollViewer which allows me to … scroll (tadaa!).

Databinding support for HTML strings

First about the databinding support for HTML strings.
I got this solution from another blog, but unfortunately I forgot which one and can’t find it anymore in my history… I’ll add the author/link once I found it.

The WebView class itself is sealed so I can’t inherit from it.
Another possibility is to register a new attribute for the WebView.

First a look at the code:

public static string GetHtmlContent(WebView view)
{
    return (string)view.GetValue(HtmlContentProperty);
}

public static void SetHtmlContent(WebView view, string value)
{
    view.SetValue(HtmlContentProperty, value);
}

public static readonly DependencyProperty HtmlContentProperty =
    DependencyProperty.RegisterAttached(
        "HtmlContent", 
        typeof(string), 
        typeof(WebViewExtensions),
        new PropertyMetadata(null, OnHtmlContentChanged)
    );

private static void OnHtmlContentChanged(DependencyObject sender,
    DependencyPropertyChangedEventArgs e)
{
    var webView = sender as WebView;
    if (webView == null)
        throw new NotSupportedException();

    if (e.NewValue != null)
    {
        webView.NavigateToString(e.NewValue.ToString());
    }
}

I’ve added this snippet in a static class called WebViewExtensions because additional functionality will be added later on.
You can now easily use the attribute in XAML:

<WebView mycustomnamespace:HtmlContent="{Binding MyProperty}" />

Ok that’s one down.

Resize the WebView according to the content

I used a solution from Jason Poon, but I needed to modify it a little bit to make it work.
The value you get from the JavaScript is in pixels. The unit of the Height property of the WebView is by default in DIP (Device Independent Pixels) which is 1/96th inch according to the documentation of Microsoft.

So before passing the value to the property we need to do a little formula.

var heightString = await webView.InvokeScriptAsync("var height = document.getElementById('content').clientHeight; return height.toString();", new string[0]); 

int height; 
if (int.TryParse(heightString, out height)) {     
    int dipHeight = ((int)(height * 96) / (int)DisplayInformation.GetForCurrentView().RawDpiY);     
    webView.Height = dipHeight; 
}

Because we’re calculating the height we only need the value of the Y-axis.

Unfortunately, we’re not done yet.

When we want to scroll the view we’re still activating the scroll in the WebView.
This is somewhat of a hack, but it seems to work quite well.

The idea is to add a transparent layer on top of the WebView.

<ScrollViewer x:Name="LayoutRoot">
    <StackPanel>
        <Grid>
            <StackPanel>
                <WebView Height="100" mycustomnamespace:WebViewExtensions.HtmlContent="{Binding MyProperty}" />
            </StackPanel>
            <Grid Background="Transparent" Height="Auto" />
        </Grid>
    </StackPanel>
</ScrollViewer>

The touch events are now passed on to the Grid which activates the ScrollViewer.

That’s it! Let’s recap with the complete code!

public static class WebViewExtensions
{
  public static async void ResizeToContent(this WebView webView)
  {
      var heightString = await webView.InvokeScriptAsync("var height = document.getElementById('content').clientHeight; return height.toString();", new string[0]); 
      int height;
      if (int.TryParse(heightString, out height))
      {
          int dipHeight = ((int)(height * 96) / (int)DisplayInformation.GetForCurrentView().RawDpiY);
          webView.Height = dipHeight;
      }
  }

  public static string GetHtmlContent(WebView view)
  {
      return (string)view.GetValue(HtmlContentProperty);
  }

  public static void SetHtmlContent(WebView view, string value)
  {
      view.SetValue(HtmlContentProperty, value);
  }

  public static readonly DependencyProperty HtmlContentProperty =
      DependencyProperty.RegisterAttached(
      "HtmlContent", typeof(string), typeof(WebViewExtensions),
      new PropertyMetadata(null, OnHtmlContentChanged));

  private static void OnHtmlContentChanged(DependencyObject sender,
      DependencyPropertyChangedEventArgs e)
  {
      var webView = sender as WebView;
      if (webView == null)
          throw new NotSupportedException();

      if (e.NewValue != null)
      {
          webView.NavigateToString(e.NewValue.ToString());
      }
  }
}

It feels somewhat like applying different hacks together but it seems to work quite well!

Setting up a WordPress development environment with Vagrant

Now and then I need to set up some simple WordPress websites for friends or relatives.
The setup I used until now was a virtual machine I configured solely for the development of those sites. The idea was that I could easily move around the virtual machine to another laptop when needed.

However, I failed to make good backups of the virtual machine so I was searching for a better alternative for a while now.

One possible solution was to create a development environment in the cloud with Azure but this seemed a bit overkill.

A while ago I already gave Vagrant a try, but it didn’t work out very well (lots of error messages etc…)
However, I decided to try it again and I didn’t encounter any blocking issues this time.

The hard part was configuring a bootstrap file to set up a WordPress environment with the initial database configuration.
The reason for this post is outlining these steps to create a virtual machine with a basic WordPress installation using Vagrant.

If you never used Vagrant before I recommend to follow the “Getting started” page on their website.
If you’re able to run a basic virtual machine (this is where it went wrong with my first Vagrant try) as described on that page, come back and continue with this post here.

 Vagrant file

If you followed along the Getting started page, then a Vagrant file should not be an unfamiliar thing to you.
There are four changes I made to the file but two of them are optional changes.

Enable provisioning with a shell script (mandatory to follow along)
config.vm.provision :shell, path: "bootstrap.sh"
Set the permissions on the shared folder (mandatory)
config.vm.synced_folder ".", "/vagrant", :mount_options => ["dmode=777","fmode=666"]

This is necessary to make sure WordPress has the correct permissions to upload files. As you may notice the settings above are unsecure (777 setting) but for development this shouldn’t be an issue.

I used a Ubuntu box as setup
config.vm.box = "ubuntu/trusty64"
Create a private network (optional)
config.vm.network "private_network", ip: "192.168.100.2"

I then created an entry in my hosts file to map this IP to a specific URL (dev.caffeinetocode.be for example)

 Bootstrap file

This file is the shell script we configured in the Vagrant file when we enabled provisioning.

First, let me show you the complete file.
Almost everything of the configuration below is copied from the WordPressWithVagrant repository on GitHub, but I needed to make some additional tweaks to get it work.

#!/usr/bin/env bash

sudo debconf-set-selections <<< 'mysql-server-5.5 mysql-server/root_password password averycomplexpassword'
sudo debconf-set-selections <<< 'mysql-server-5.5 mysql-server/root_password_again password averycomplexpassword'
sudo apt-get update
sudo apt-get -y install mysql-server-5.5 php5-mysql apache2 php5

if ! [ -L /var/www ]; then
  rm -rf /var/www
  ln -fs /vagrant/public /var/www

  a2enmod rewrite

  sed -i 's:<Directory /var/www/>:<Directory /vagrant/public/>:' /etc/apache2/apache2.conf
  sed -i 's:/var/www/html:/vagrant/public:' /etc/apache2/sites-enabled/000-default.conf
  service apache2 restart
fi

if [ ! -f /var/log/databasesetup ];
then
    echo "CREATE USER 'wordpressuser'@'localhost' IDENTIFIED BY 'wordpresspass'" | mysql -uroot -paverycomplexpassword
    echo "CREATE DATABASE test" | mysql -uroot -paverycomplexpassword
    echo "GRANT ALL ON test.* TO 'wordpressuser'@'localhost'" | mysql -uroot -paverycomplexpassword
    echo "flush privileges" | mysql -uroot -paverycomplexpassword

    mysql test -u root -prootpass < /vagrant/wp_setup/database/initial_database_setup.sql

    touch /var/log/databasesetup
fi

Let’s review each step.

sudo debconf-set-selections <<< 'mysql-server-5.5 mysql-server/root_password password averycomplexpassword'
sudo debconf-set-selections <<< 'mysql-server-5.5 mysql-server/root_password_again password averycomplexpassword'

After installing MySQL it will ask some questions to complete the installation.
Because we don’t want to enter these details over and over again when booting up the virtual machine we can use the command debconf-set-selections which allows for easier installation.

So here we tell MySQL to use the password averycomplexpassword for the root user when installing MySQL.

sudo apt-get update
sudo apt-get -y install mysql-server-5.5 php5-mysql apache2 php5

Next we will update all installed packages and install the required components the run a WordPress site.
No further explanation needed I guess.

if ! [ -L /var/www ]; then
  rm -rf /var/www
  ln -fs /vagrant/public /var/www

  a2enmod rewrite

  sed -i 's:<Directory /var/www/>:<Directory /vagrant/public/>:' /etc/apache2/apache2.conf
  sed -i 's:/var/www/html:/vagrant/public:' /etc/apache2/sites-enabled/000-default.conf
  service apache2 restart
fi

By default, Vagrant provides a shared folder (/vagrant) which is accessible by the host and guest.
I’ve created an extra folder inside the vagrant folder where all my WordPress files will be stored.

In this part it will create a symbolic link from the public folder in the shared folder to the /var/www folder.
It also changes two configuration files of Apache to use the shared Vagrant folder as web root.

It then restarts the Apache service.

if [ ! -f /var/log/databasesetup ];
then
    echo "CREATE USER 'wordpressuser'@'localhost' IDENTIFIED BY 'wordpresspass'" | mysql -uroot -paverycomplexpassword
    echo "CREATE DATABASE test" | mysql -uroot -paverycomplexpassword
    echo "GRANT ALL ON test.* TO 'wordpressuser'@'localhost'" | mysql -uroot -paverycomplexpassword
    echo "flush privileges" | mysql -uroot -paverycomplexpassword

    mysql test -u root -prootpass < /vagrant/wp_setup/database/initial_database_setup.sql

    touch /var/log/databasesetup
fi

Next and final step is setting up the database.
When configuring WordPress for the first time you will need to uncomment the following line:

mysql test -u root -paverycomplexpassword < /vagrant/wp_setup/database/initial_database_setup.sql

This SQL file will be created after you runned through the WordPress installation.
But basically this part of the script checks if there’s a certain file available which should have been created the first time. We do this check because we don’t want to run this part of the script again when resuming or reloading the configuration.

It creates a new MySQL user which gets access to our database.

If everything went well you should be able to access your WordPress site by the specified IP-address in your Vagrant file (or URL if you also configured it in your hosts file).

Creating a initial SQL script for WordPress

After completing the installation step of your WordPress site, access your VM with

vagrant ssh

Enter the following command in the command prompt

mysqldump -h localhost -u root -paverycomplexpassword test (this is the database name) > initial_database_setup.sql

Now copy this file to a folder inside your Vagrant folder (I used wp_setup/database).
Uncomment the line in the script as stated previously and destroy your VM to test if everything works.

vagrant destroy

Restart your VM with

vagrant up

And when everything is booted up, you should be able to access your WordPress site without any additional configuration required!

xbuild and “the PCL reference assemblies not installed” error message

I was trying to setup a build script with FAKE to build a Xamarin solution via a bash script which I could then use in TeamCity.
In Xamarin Studio I could build my solution without any errors but when trying to run my script in a terminal, I received this error: “PCL reference assemblies not installed”.

I searched for several solutions untill I uninstalled Xamarin and Mono.
When reinstalling Xamarin I suddenly noticed that it was installing Mono version 4.0.2.

The error message, however, showed version 4.0.1.

After noticing this difference, I remembered I installed Mono via Homebrew to run ASP.NET vNext on Mac OS X.
After uninstalling it with

brew uninstall mono

, my script runned without any errors.

Sigh…